Back to Contents Page
Dell™ Latitude™ C400
Service Manual
 Removing the Battery Latch
Replacing the Battery Latch
 |
NOTICE: Disconnect the computer and any attached devices from electrical
outlets, and remove any installed batteries.
|
|
NOTICE: To avoid ESD, ground yourself by using a wrist grounding strap or
by touching an unpainted metal surface on the computer.
|
- Remove the PC Card or plastic blank, if present, from the PC Card
slot.
- Remove the hard drive.
- Remove the keyboard.
- Remove the display assembly.
- Remove the palm rest.
- Remove the wireless network adapter, if present.
- Remove the modem daughter card, if present.
- Remove all installed memory modules.
- Remove the audio board.
- Remove the system board.
Battery Latch Removal
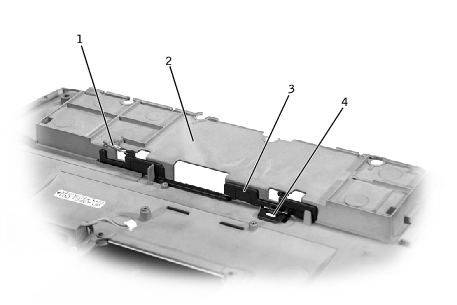
1 | tension spring |
2 | bottom case |
3 | battery latch |
4 | battery release-button tabs |
|
NOTICE: The tabs on the release button are plastic. When squeezing the tabs,
be careful not to break them.
|
- On the inside of the bottom case, use needle-nose pliers to gently
squeeze the two release-button tabs together and push the tabs down
through the hole, catching the release button on the outside of the
bottom case.
- To remove the battery latch, unhook the small tension spring located
on the metal post next to the hard drive.
- With the inside of the bottom case facing up, place the battery latch
in position.
- Turn the bottom case over and align the slot in the battery latch with
the release-button slot in the bottom case.
- Holding the battery latch in place, press the release-button tabs
through the underside of the bottom case and into the battery latch
until the tabs snap into place.
- Replace the tension spring.
Back to Contents Page