 Removing the Keyboard
Dell™ Latitude™ C400 Service Manual
 |
NOTICE: Disconnect the computer and any attached devices from electrical outlets, and remove any installed batteries. |
|
NOTICE: To avoid ESD, ground yourself by using a wrist grounding strap or by touching an unpainted metal surface on the computer. |
|
NOTICE: Read "Preparing to Work Inside the Computer" before performing the following procedure. |
|
NOTICE: The key caps on the keyboard are fragile, easily dislodged, and time-consuming to replace. Be careful when removing and handling the keyboard. |
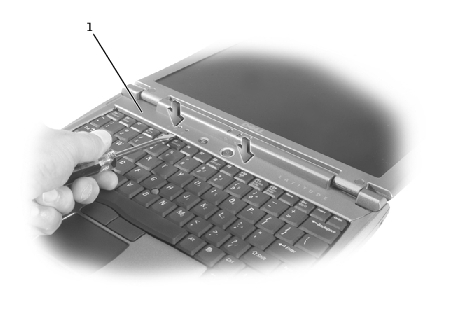
1 | center cover |
 |
NOTE: To protect the keycaps, it may be helpful to place a straightedge (such as a short ruler) across the first row or two of keycaps, and press on the straightedge instead of on the keycaps themselves. |
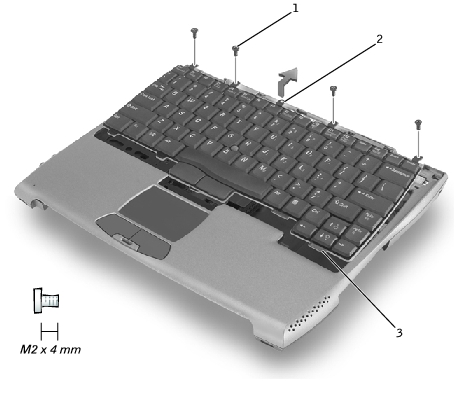
1 | M2 x 4-mm screws (4) |
2 | keyboard locator tab |
3 | keyboard securing tabs (5) |
|
NOTICE: Do not pull on the keyboard flex cable. |
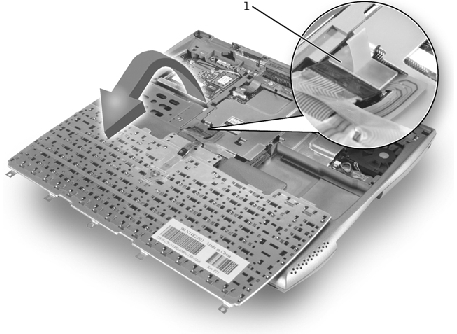
1 | keyboard flex cable |
The keyboard is now disconnected from the bottom case.
|
NOTICE: To avoid damage to the connector pins, press the keyboard flex cable connector evenly into the interface connector on the system board, and do not reverse the keyboard connector. |
To aid with proper flex cable connection, a white locator line has been added near the end of the flex cable. Press the cable into the connector until the white line disappears and hold it steady while you snap the flex cable connector down. (The white line may reappear after the connector is closed; this should not indicate a problem with the connection.)
|
NOTICE: Position the keyboard flex cable so that it is not pinched when you replace the keyboard in the bottom case. |
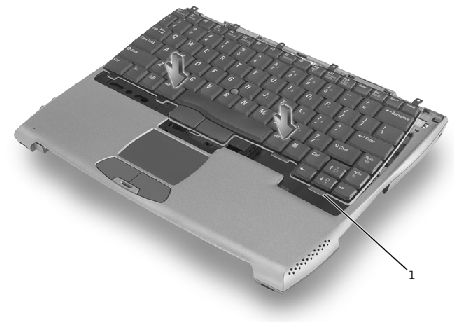
1 | keyboard securing tabs (5) |
Ensure that all five securing tabs are engaged in their respective slots before trying to completely seat the keyboard. Fitting the tabs to the slots may be easiest when viewed from above and slightly behind the front edge of the keyboard. Press down on the left and right <ALT> keys to help control tab/slot alignment.
When the keyboard appears to be completely seated, confirm that the front edge of the keyboard is aligned with the edge of the palm rest before proceeding.