- Start with the monitor and the PC turned off.
- Turn on the monitor first; then turn on the PC.
NOTE: The screen remains blue until the computer is ready.
This is not a problem. If an error message is displayed
If the message UNSUPPORTED VIDEO is displayed, or if nothing
is displayed, check that:
- The video interface cable is connected properly.
- The correct video adapter card (see page Appendix F, "Graphic Adapters" on page 85) for your PC is installed.
- The correct supported display mode is selected for your PC.
- Insert the diskette labeled Setup Option Diskette (for DOS/Windows) into the diskette drive.
NOTE: The application programs included in the setup option diskettes
are used only for displaying the color-bar patterns. They are not for changing the display driver.
Wait about 15 minutes until the monitor warms up.
NOTE: If the monitor is in standby mode ("STANDBY ON"), it might
automatically turn off while you are waiting for it to warm up.
Exit standby mode (refer to explanation of STANDBY).
- Display the command prompt screen of the PC-DOS full-screen display
by pressing Enter while pressing Alt.
- If Windows is installed, open the PC-DOS prompt from the Program
Manager to display the PC-DOS full-screen.
- If OS/2 is installed, open the PC-DOS full-screen display from the
command prompt of OS/2.
- If only PC-DOS is installed, the command prompt is displayed when
the system is started.
- If you are using PC-DOS/V, change to U.S. mode by typing CHEV US
and pressing Enter at the command prompt.
- At the command prompt, type A: and press Enter.
- Type TESTPATD and press Enter. The color-bar pattern appears:
If, after a few seconds, the setup main menu appears and starts
automatically, go to step 11. If it does not appear
and start automatically, go to the next step.
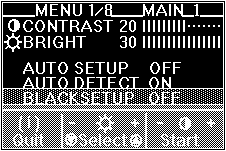
- Push the setup switch on the back of the monitor.
The setup main menu appears:

- Push one of the brightness control buttons to select AUTO SETUP.
- Push one of the contrast control buttons. The AUTO SETUP line
changes to "START" and auto setup starts.
- Wait until the "PRESS [ENTER] KEY" message is displayed (after 10 to 20 seconds).
- Press Enter to continue the auto setup procedure.
The AUTO SETUP line changes to "COMPLETED" when auto setup is complete.
The screen might be distorted during setup. This is not a problem.
If the screen flickers, go back to step 8 and redo the setup several
times until the flicker is minimized, or adjust it manually by doing manual setup (see Appendix A).
If "AUTO SETUP COMPLETED" is not displayed
If the setup main menu is on the screen, go back to step 9.
Otherwise, return to step 8. Repeat the auto setup procedure. If
the "AUTO SETUP FAILED" message appears, repeat the auto
setup procedure several times.
If you still cannot complete the setup, adjust it manually by using
manual setup, or contact the Display Business Unit (DBU) helpline.
- Push the setup switch on the back of the monitor to turn off the setup main menu.

 for any BUG on this page found - Thank you.