Back to Contents Page

Battery and Module Bay Latches

Dell™ Latitude™ C840 Service Manual


NOTICE: Disconnect the computer and attached devices from electrical outlets and remove any installed batteries.
NOTICE: To avoid ESD, ground yourself by using a wrist grounding strap or by periodically touching unpainted metal on the computer.
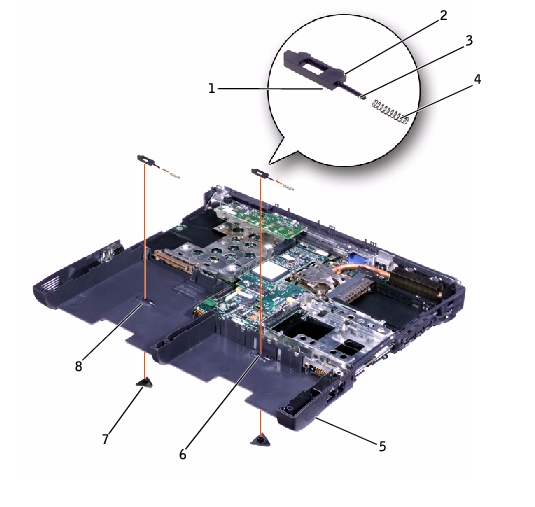
1

wear ribs (2 on underside)

2

bumps

3

slider

4

spring

5

bottom case

6

latch housing (2)

7

latch buttons (2)

8

location of snap tabs (2)

Removing and Replacing the Battery and Module Bay Latches

  1. Follow the instructions in "Preparing to Work Inside the Computer."

  2. Remove the keyboard.

  3. Remove the hinge cover.

  4. Remove the display assembly.

  5. Remove the palm rest.

  6. Remove a latch button from the bottom case by squeezing the snap tabs in the center of the latch.

Tape over or hold down the upper latch assembly (spring and slider) to hold the assembly in place. Apply downward pressure to the snap tabs while squeezing them together (tweezers work well) to eject the latch button from the underside of the bottom case without loosening the upper latch assembly. If the upper latch assembly does come loose:

    1. Slide the spring onto the slider, and reinstall both pieces in the latch housing on the inside of the bottom case.

    1. Ensure that the slider is inserted so that the side with the two bumps is facing the back of the bottom case, and the surface with the wear ribs lies against the upper surface of the bottom case.

  1. Hold the upper latch assembly in place while you snap the new latch button in from underneath the bottom case, making certain the snap tabs are fully engaged in the slider.

Ensure that the newly installed latch assembly moves smoothly and freely when pushed and released.


Back to Contents Page