Back to Contents Page

Back-Panel Fan (V740 Only)

Dell™ Latitude™ V710/V740 Service Manual


Removing the Back-Panel Fan

NOTICE: To prevent data loss, turn off the computer before removing the back-panel fan. Do not remove the fan while the computer is on or in a power management mode.
NOTICE: Read "Preparing to Work Inside the Computer" before performing the following procedure.
  1. Ensure that the work surface is flat and clean to prevent scratching the computer cover.

  2. Save and close any open files, exit any open programs, and shut down the computer.

NOTICE: Disconnect the computer and any attached devices from electrical outlets, and remove any installed batteries.
NOTICE: To avoid ESD, ground yourself by using a wrist grounding strap or by touching an unpainted metal surface on the computer.
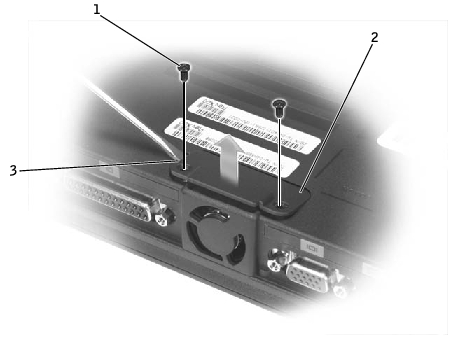
  1. Turn the computer over. Use a #1 Phillips screwdriver to remove the two M2.5 x 5-mm screws from the fan cover, and place the screws in a safe location.

1

M2.5 x 5-mm screws (2)

2

fan cover

3

scalloped left edge of fan cover

  1. Use a small flat-blade screwdriver or plastic scribe to lift the scalloped left edge of the fan cover, and pry the cover loose from the bottom case.

  2. Lift the fan cover up and away from the bottom case.

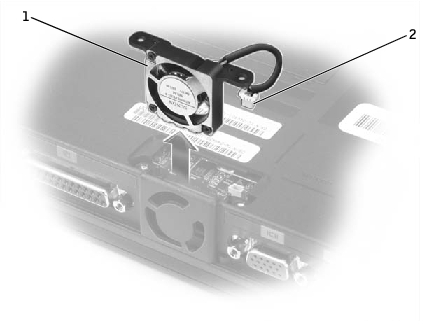
  3. Disconnect the fan cable connector from the system board.

  4. Lift the fan out of the bottom case.

1

fan

2

fan cable connector

Replacing the Back-Panel Fan

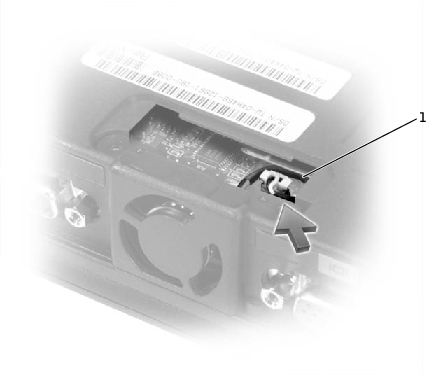
  1. Slide the fan into the bottom case.

  2. Tuck the fan cable under the bottom case, and connect the cable to the system board.

1

fan cable

  1. Replace the fan cover, and reinstall the two M2.5 x 5-mm screws that secure the cover to the bottom case.


Back to Contents Page