| About the I/O Connectors | External Monitor | ||
| Mouse, Keyboard, and External Numeric Keypad | AC Adapter | ||
| USB Devices | Audio Devices | ||
| Parallel Devices | External Media Options | ||
| Docking Devices |
| About the I/O Connectors | External Monitor | ||
| Mouse, Keyboard, and External Numeric Keypad | AC Adapter | ||
| USB Devices | Audio Devices | ||
| Parallel Devices | External Media Options | ||
| Docking Devices |
You can connect external devices to the input/output (I/O) connectors. The computer's basic input/output system (BIOS) detects the presence of external devices when you boot (start) or reboot your computer. Figure 1 shows the I/O connectors on the back of your computer; Figure 2 shows the external media bay and audio connectors on the right side of the computer.
| NOTES: Some external devices
require you to load software called device drivers into system memory before the devices
will work. These device drivers help your computer recognize the external device and
direct its operation. Instructions for installing this software are usually included in
the upgrade kits. The C/Port Family Advanced Port Replicator (APR) has the same I/O connectors as your computer. In addition, the C/Port APR has a second Personal System/2 (PS/2) connector, a second Universal Serial Bus (USB) connector, and an Ethernet network connector. The C/Dock Family Expansion Station has the same I/O connectors as your computer. In addition, the C/Dock Expansion Station has a second PS/2 connector, a second USB connector, an Ethernet network connector, and a small computer system interface (SCSI) connector. |
Figure 1. I/O Connectors On the Back of the Computer
 |
Figure 2. I/O Connectors On the Right Side of the Computer
 |
|
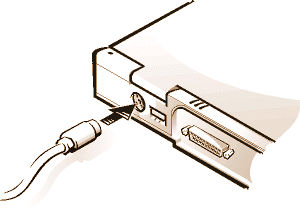
You can attach a PS/2-compatible device such as a mouse, 101- or 102-key keyboard, or external numeric keypad to the mini-Deutsche Industrie Norm (DIN) PS/2 connector.
You can also connect these devices to the C/Port Family APR or the C/Dock Family Expansion Station.

| NOTE: If the computer is in suspend (or standby) or suspend-to-disk mode when you attach a mouse, you can use the mouse when the computer resumes normal operation. However, programs that were already running may need to be restarted to recognize the mouse. If the computer is not in suspend (or standby) or suspend-to-disk mode when you attach the mouse, you must reboot the computer to use the mouse. |
When you attach a PS/2 mouse to the computer, the touch pad is automatically disabled. If you disconnect the mouse, you must shut down the computer or enter suspend or standby mode and then resume from it before the touch pad is operational. If you do not do this, the touch pad resumes operation in standard PS/2 mode, which means that many of the configuration features are disabled.
If you are using a PS/2-compatible mouse that is not made by Microsoft and the mouse does not work properly, reboot the computer. If the mouse still does not work, install the drivers from the diskette that came with the mouse and reboot the computer.
| NOTE: If the computer is in suspend (or standby) mode or suspend-to-disk mode when you attach an external keyboard, the device is recognized immediately by the computer when it resumes normal operation. |
You can use the computer's keyboard and an external keyboard at the same time. When you attach a keyboard to the computer, the embedded numeric keypad is automatically disabled.
On an external keyboard, the <Scroll Lock> key acts the same way as the <Fn> key on the computer’s keyboard (if the External Hot Key option is enabled in the System Setup program).
| NOTE: If the computer is in suspend (or standby)
mode or suspend-to-disk mode when you attach an external numeric keypad, the device is
recognized immediately by the computer when it resumes normal operation. |
When you attach an external numeric keypad to the computer, the numeric keypad on the computer keyboard is automatically disabled. The indicators on the integrated keyboard track the operation of an external numeric keypad.
You can attach a USB hub device to the USB connector. The USB hub device can support multiple USB devices (typically low-speed peripherals such as mice, keyboards, printers, and computer speakers). The C/Port APR Family and the C/Dock Expansion Station Family docking solutions have two USB connectors.
| NOTE: If you are using a USB external keyboard, do not enter the System Setup program by using a keyboard command on an external keyboard. Instead, press <Fn><F1> on the computer's keyboard. |
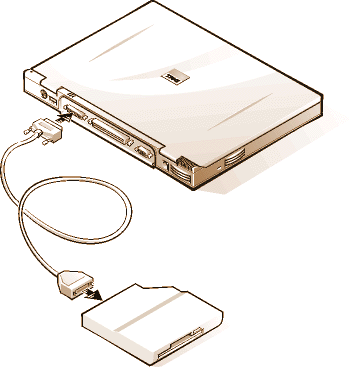
You can attach a parallel device (usually a printer) to the 25-hole parallel connector. You can also connect the diskette drive to the parallel connector.
The parallel port sends and receives data in parallel format, where eight data bits (one byte) are sent simultaneously over eight separate lines. The port can be configured as a unidirectional (output-only) port for devices such as a printer or as a bidirectional port for devices such as a network adapter.
The computer's integrated parallel port is designated as LPT1. The Microsoft® Windows® 95 and Windows 98 operating systems automatically recognize the parallel device and configure it correctly. The parallel port can also be configured for compatibility with the PS/2 standard.
You can use the the diskette drive as a second external device if you already have a device connected to the media bay connector. The diskette drive letter is A, unless a diskette drive is already installed in the external media bay, in which case the drive connected to the parallel connector is drive B.
To connect the drive to the parallel connector on the I/O panel, use the optional parallel diskette-drive cable (available from Dell), as shown in Figure 5.
Figure 5. Connecting a Diskette Drive to the Parallel Connector

NOTICE: When the diskette drive is not being used externally, remove the parallel diskette-drive cable from the parallel connector.
NOTICE: Use the parallel diskette-drive cable only with the diskette drive. Do not try to connect any other device to the computer with this cable.
If the Diskette Reconfig option is set to Any Time in the System Setup program, you can connect the diskette drive to the parallel connector while the computer is turned on.
The drive access indicator does not blink when data is being accessed from the diskette drive connected to the parallel connector.
NOTICE: Protect the diskette drive when it is not in the external media bay. Do not squeeze the drive or place objects on top of it; doing so could damage the drive motor.
You can attach your computer to Dell's C/Port Family APR and C/Dock Family Expansion Station docking devices through the docking connector. For information on docking your computer, see the documentation that came with your docking device.
You can use the 15-hole video connector to attach an external monitor to the computer.
To attach an external monitor, perform the following steps.
NOTICE: Do not place the monitor directly on top of your portable computer, even if it is closed. Doing so can crack the computer case, the display, or both.
Plug the video cable connector into the matching video connector on the back of the computer, as shown in Figure 6. If the video cable is not permanently attached to the monitor, connect it to the monitor.
Figure 6. Connecting an External Monitor

Be sure to tighten all the screws on the video cable connector(s) to eliminate radio frequency interference (RFI).
Plug the three-prong connector on one end of the monitor's power cable into a grounded power strip or some other grounded power source. If the cable is not permanently attached to the monitor, connect it to the monitor.
You can also connect an external monitor to the C/Port Family APR or the C/Dock Family Expansion Station.
NOTE: If you are using the Microsoft Windows 98 operating system, you can use an external monitor as an extension of your display. For more information, see the Windows 98 documentation or "Dual-Display Mode."
When an external monitor is connected to the computer, the video image automatically appears on the external monitor's screen when you boot your computer.
To toggle the video image between the display, an external monitor, or both simultaneously, press <Fn><F8> on the keyboard. Press <Scroll Lock><F8> on an external keyboard if the External Hot Key option is enabled in the System Setup program.
If the external monitor is turned off when you boot your computer, the computer still sends the video image to the external monitor, but you will not see an image on either the computer's display or the external monitor. To see an image, turn on the external monitor or switch the video image to the computer’s display by pressing <Fn><F8> on the keyboard or <Scroll Lock><F8> on an external keyboard if the External Hot Key option is enabled in the System Setup program.
| NOTE: If you are using your external monitor at a resolution greater than the display supports, the simultaneous display feature is disabled. To use the display, switch to a resolution that the computer supports, or disconnect the external monitor and restart your computer. |
You can attach the AC adapter to the computer by using the AC adapter connector. The AC adapter converts AC power to the DC power required by the computer.
You can connect the AC adapter with your computer turned either on or off.
The AC adapter works with electrical outlets worldwide. However, power connectors vary among countries. Before using AC power in a foreign country, you may need to obtain a new power cable designed for use in that country.
You can connect audio devices such as speakers, microphones, and headphones to the two audio jacks, as follows:
| NOTE: The C/Port Family APR also has a headphones/speaker jack. The C/Dock Family Expansion Station has a line-in/audio-in jack as well as microphone and headphones/speaker jacks. |
If your computer is running the Windows 95 operating system, you can control the sound on your computer through the Dell Control Center Speaker window, the System Setup program, and key combinations.
You can connect external media options such CD-ROM, DVD-ROM, SuperDisk LS-120, and diskette drives to the external media bay connector.