 |

 IBM-AUSTRIA - PC-HW-Support 30 Aug 1999
 |
Removal and Replacement Procedures (9516)
 Removal and Replacement Procedures
This section contains information on removal and replacement.
- The arrows in this section show the direction of movement to remove a FRU.
The arrows are marked in numeric order, in square callouts, to show the correct
sequence of removal.
- To replace a FRU, reverse the removal procedure and follow any notes that pertain
to replacement. See 'Locations' for internal cable connections and arrangement information.
- When other FRUs must be removed before removing the failing FRU, they are listed at the
top of the page.
- When replacing a FRU, restore the screws to the same places they were removed from.
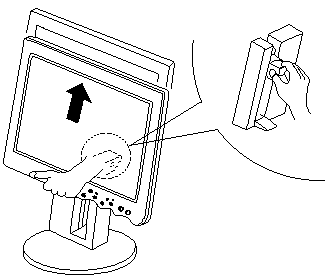
 Do not put your fingers in the gap of part A.
They can be pinched when you raise the LCD.

 The LCD panel and the main card are sensitiveto, and can be damaged
by, electrostatic discharge (ESD). Establish personal grounding by touching a ground point with one hand
before touching these units. An electrostatic discharge strap can be used to establish personal grounding.
 When the LCD becomes dirty, gently wipe it clean with a dry, soft cloth. Avoid using alcohol or
detergent to clean the LCD.
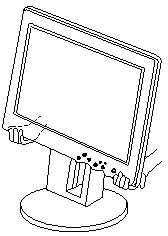
When you transport the display, hold it as shown:

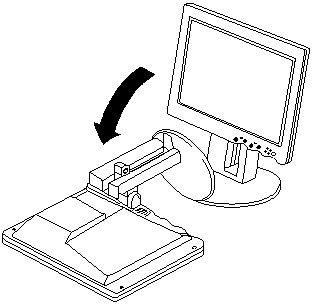
 You should spread a piece of soft cloth on a flat surface. Then, ehen required, place the
LCD facedown on the cloth to prevent the screen surface from being damaged.
- While putting the height adjustment buttons, raise the LCD to its highest position.
- Gently put the display face down on the cloth-covered flat surface.

Back to 
More INFORMATION / HELP is available at the IBM-HelpCenter
Please see the LEGAL - Trademark notice.
Feel free - send a  for any BUG on this page found - Thank you.
 Removal and Replacement Procedures
 Do not put your fingers in the gap of part A.
 The LCD panel and the main card are sensitiveto, and can be damaged
by, electrostatic discharge (ESD). Establish personal grounding by touching a ground point with one hand
before touching these units. An electrostatic discharge strap can be used to establish personal grounding.
 When the LCD becomes dirty, gently wipe it clean with a dry, soft cloth. Avoid using alcohol or
detergent to clean the LCD.

 You should spread a piece of soft cloth on a flat surface. Then, ehen required, place the
LCD facedown on the cloth to prevent the screen surface from being damaged.

 for any BUG on this page found - Thank you.