Return to MAIN-Index  Return to SUB-Index    IBM-AUSTRIA - PC-HW-Support    30 Aug 1999

Defining the State of a Drive (ServeRAID)


Defining the State of a Drive


To define the state of a physical hard disk drive attached to the ServeRAID adapter, you can use the Administration and Monitoring program or the ServeRAID configuration program. By using the Administration and Monitoring program from the active operating system desktop, you do not have to restart the server. Refer to the README file on the Administration and Monitoring program for instructions for the operating system.

To define the state of a drive from the ServeRAID configuration program:
  1.  Start the ServeRAID configuration program (see 'Starting the ServeRAID Configuration Program')
  2.  Select Rebuild/Device Management from the Main Menu.
  3.  Select Set Device State. The cursor will become active in the Bay/Array selection list.


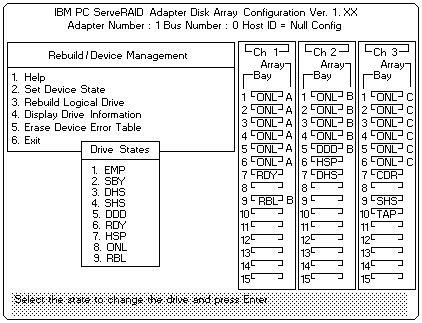
  4.  Use the Up Arrow (  ) or the Down Arrow (  ) key to highlight the appropriate drive, then,  press Enter. The Drive States pop-up window appears, listing all hard disk drive states.
  5.  Highlight the appropriate drive state and press Enter. The cursor will become active in the Bay/Array  selection list, and will display the new state.

      Device States     Alternate States
      --------------------------------------
      EMP               RDY  SBY
      SBY               RDY  EMP  HSP  SHS
      DHS               EMP  HSP  SHS
      SHS               HSP  DHS
      DDD               ONL  RBL
      RDY               EMP  HSP  SHS  SBY
      HSP               RDY  SHS  DHS
      ONL               DDD
      RBL               DDD  ONL
     

     The numbers shown on the left in the Bay/Array selection list area in the previous figure are the bay numbers.  See 'Bay/Array Selection List' for an explanation of the bay numbers.

  6.  If you want to create a disk array, go to 'Creating a Disk Array'
  7.  If you are finished:

    1.  Select Exit or press Esc A pop-up window will  appear asking to confirm your change.

      Note: The changes you make are not saved until you confirm them  by selecting Yes in the Confirm pop-up window.

    2.  Select No if you do not want the drive you selected to use the new drive state.  Select Yes to accept the new drive state.
    3.  Back up the disk-array configuration information to diskette.  See 'Backing Up the Disk-Array Configuration'.


Back to  Jump to TOP-of-PAGE
More INFORMATION / HELP is available at the  IBM-HelpCenter

Please see the LEGAL  -  Trademark notice.
Feel free - send a Email-NOTE  for any BUG on this page found - Thank you.