 |

 IBM-AUSTRIA - PC-HW-Support 30 Aug 1999
 |
Installing the Processor Assembly
Installing the Processor Assembly
Complete this procedure to install the processor assembly.
- Lift the processor assembly by the openings in the
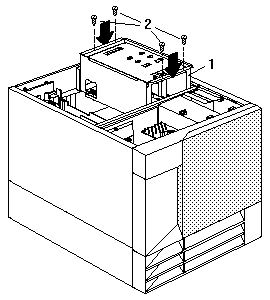
top cover and orient the processor assembly 1 with
the DIMMs toward the rear of the server.

- Carefully lower the processor assembly into the
server shuttle until it is fully seated.
- Install and tighten the four screws 2 that you
removed in step 12 of
Removing the Processor Assembly.
Note:
If you removed the air diffuser, reinstall it now.
- Reconnect the two cables that you disconnected in step 11 of
Removing the Processor Assembly.

- Slide the shuttle into place and tighten the four shuttle thumbscrews.
- Reinstall the top cover.
- Check that all cables, adapters, and other
components are installed and seated correctly
and that you have not left loose tools or parts inside the server.
- Lower the cover with the rear edge of the cover
approximately 2.5 cm (1 in.) back from the rear
edge of the server.
- Slide the cover forward.
- Tighten the two thumbscrews on the back edge of the cover.
Back to 
More INFORMATION / HELP is available at the IBM-HelpCenter
Please see the LEGAL - Trademark notice.
Feel free - send a  for any BUG on this page found - Thank you.


 for any BUG on this page found - Thank you.