 |

 IBM-AUSTRIA - PC-HW-Support 30 Aug 1999
 |
Installing memory-modules
Installing memory-modules
You install the memory modules on the processor
assembly included in the Processor Upgrade Kit. You
must install memory modules that are compatible with the
Processor Upgrade Kit.
 Important:
When installing memory, keep the following in mind:
- Install only 3.3 V, 168-pin, 8-byte, registered DIMMs.
- The memory-module kit sizes available for the
server are 128 MB, 256 MB, and 512 MB.
The server supports a minimum of 128 MB and a maximum of 2 GB of system memory.
- Only 100 MHz, 72-bit, registered, synchronous,
ECC, x4 configuration DIMMs are supported for the 128, 256 and 512 MB DIMMs.
- Installing or removing memory modules changes
the configuration information in the server.
After adding or removing a DIMM, save the new configuration information in the
Configuration/Setup program.
When you restart the server, the system displays a message indicating that
the memory configuration has changed. Start the Configuration/Setup program
and select Save Settings.
Refer to the documentation that comes with the server for more information.
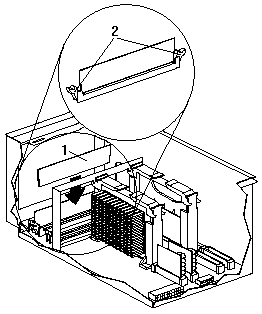
Install the first memory module in DIMM socket 4. Install
additional memory modules in DIMM sockets 3, 2, and 1 in
that order. If you mix DIMM sizes, install the largest sized
DIMM in DIMM socket 4, the next largest sized DIMM in
DIMM socket 3, and so forth.

Complete this procedure to install memory-modules.
- Center the DIMM 1 over the connector. Make sure
the DIMM is oriented and aligned correctly.

- Press the DIMM into the connector until the latches 2 snap
into the locked position.
- Repeat this procedure for additional DIMMs.
- Replace the processor assembly top cover 1.

- Turn the quarter-turn fasteners 2 to the locked position.
Back to 
More INFORMATION / HELP is available at the IBM-HelpCenter
Please see the LEGAL - Trademark notice.
Feel free - send a  for any BUG on this page found - Thank you.
 Important:


 for any BUG on this page found - Thank you.