 |

 IBM-AUSTRIA - PC-HW-Support 30 Aug 1999
 |
Completing the Tower Model Installation
Completing the Tower Model Installation
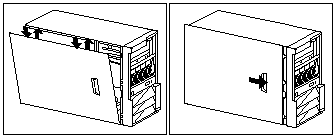
- Install the cover on the server.
- Align the left-side cover with the left side of the server, about 25 mm (1 inch)
from the front of the server, place the bottom of the left-side cover on the bottom rail
of the left-side frame.
- Insert the tabs at the top of the cover into the slots at the top of the server side.
- Hold the cover against the server and slide the cover toward the front of the server
until the cover clicks into place.
NOTE: Be sure the front edge of the cover is flat against the server.

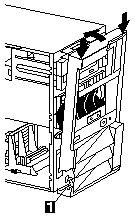
- Replace the bezel, if it was removed.
- Place the bezel tabs -1- in the slots at the bottom front of the server.
- Press the top of the bezel toward the server front until the bezel clicks into place.

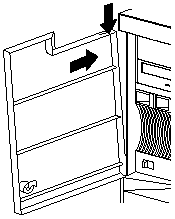
- Replace the server door, if it was removed.
- Set the door on the bottom hinge.
- Press the flange downward while pressing the top of the door toward the server,
until the flange connects with the top hinge. Release the flange.

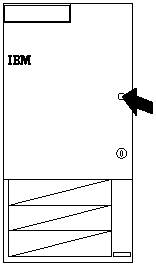
- Close and lock the server door.

Attention Be sure to maintain a clearance of at least 127 mm (5 inches) on the
front and rear of the server to allow for air circulation.
- Reconnect the cables to the back of the server, then, plug the power cords into properly
grounded electrical outlets.
- If you have a modem or fax machine attached to the server, reconnect the telephone line
to the wall outlet and the server.
What to do next When you have completed installing the covers and cables,
go to 'Updating the Server Configuration'.
Back to 
More INFORMATION / HELP is available at the IBM-HelpCenter
Please see the LEGAL - Trademark notice.
Feel free - send a  for any BUG on this page found - Thank you.


 for any BUG on this page found - Thank you.