 |

 IBM-AUSTRIA - PC-HW-Support 30 Aug 1999
 |
Removing (NetBAY3) Cage Nuts
Removing (NetBAY3) Cage Nuts
Device installation might
require the removal or moving of the rear-pane cage nuts.
If you need to move the cage nuts, follow this procedure to
move them and then go to (below) 'Installing Cage Nuts'.
to install them in the correct position.
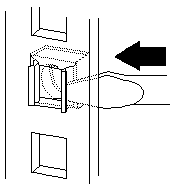
- Hold the cage nut in place and compress the
cage-nut clip with a flat screwdriver blade.

- With the cage nut-clip compressed, push the cage
nut-clip out of the square hole.
- Release the screwdriver pressure on the clip. The
cage nut is now loose and can be removed from the
square hole.
Installing Cage Nuts: The nuts go toward the
inside of the NetBAY3. Make sure you install all the cage
nuts at the same level on the mounting rails.
- Hook one side of the cage-nut clip into the
rack-mounting-rail square hole.
- Hold the cage nut in place and compress the
cage-nut clip with a flat screwdriver blade.
- With the cage-nut clip compressed, push the cage-nut
clip into the square hole.
- Release the screwdriver pressure on the clip. The
cage nut is now locked in the square hole.
Back to 
More INFORMATION / HELP is available at the IBM-HelpCenter
Please see the LEGAL - Trademark notice.
Feel free - send a  for any BUG on this page found - Thank you.

 for any BUG on this page found - Thank you.