 |

 IBM-AUSTRIA - PC-HW-Support 30 Aug 1999
 |
Netfinity 3000 - HDD Installation Instructions
IBM Netfinity 3000 Hard Disk Drive-Installation Instructions
This information is being provided to ensure proper installation of hard disk drives in bays 5 and 6.
This information replaces the hard disk drive-installation instructions in the Working with Drives in Bays 5
and 6 section of your Netfinity 3000 User's Handbook.
If you are installing a hard disk drive in bay 5 or 6, use the following procedure.
- Review the Safety Information.
- If there is a hard disk drive in bay 5 or 6, disconnect the cable from the drive in that bay.
- Remove the rear (lower) drive cage as described in the Installing or Removing Internal Drives
section of your Netfinity 3000 User's Handbook.
- When you are installing a drive, turn the drive upside down and slide it into the desired bay.
This ensures that the drive connectors will properly align with and attach to the cable connectors. Secure
the drive with the screws. See the illustration below.
Note: When using the rubber grommets (washers) to attach the drive to the rear drive cage, you
must use the screws provided in the tray in bay 2.
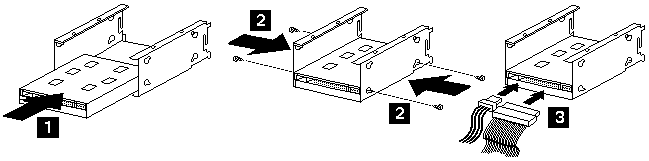
- Reinstall the rear drive cage as described in the Netfinity 3000 User's Handbook.
- Attach the cables to the drive.
More INFORMATION / HELP is available at the IBM-HelpCenter
Please see the LEGAL - Trademark notice.
Feel free - send a  for any BUG on this page found - Thank you.