 |

 IBM-AUSTRIA - PC-HW-Support 30 Aug 1999
 |
Preparing the Rack (Netfinity 7000 - 8651)
Preparing the Rack

 Four people are required to move or lift the server.
In this section, you will use the following parts:
- IBM Installation Template
- Two slide-bracket nut bar assemblies
- One cable-management arm
- Eight M4x8 pan head screws
- Eight M6x16 screws
- One cable management arm
- One arm to shuttle (CEC) bracket with cap fastener
- Two M6x16 hex flange screws
- Two M6 hex flange nuts
- Two 10-32 x 0.5-Inch screws
- One nut bar
- Two M6x16 hex flange screws
- Four M6x16 screws
- Six nut clips
 To ensure rack stability, plan the installation of servers
in the rack starting from the bottom.
To attach the mounting hardware to the rack:
- Remove the rack front door. Refer to the rack
documentation for instructions.
- Mark the positions of the slide-bracket assemblies,
bezel brackets, and the cable-management arm on
the rack:
- Position the installation template on the front
mounting rails on the rack, aligning the holes.
- Mark the holes for the slide-bracket assemblies
and bezel brackets.

- Install two cage nuts to each of the two front
mounting brackets for the bezel brackets.
- Attach the template to the rear mounting rails.
Mark the locations for the slide-bracket
assemblies and cable-management arm.
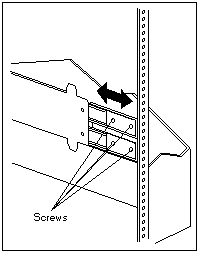
- Attach a slide-bracket assembly to the front of the rack:
NOTE:
- Get another person to help you attach the slide-bracket assemblies to the rack.
- The slide-bracket assemblies can be installed on either the left or right side of the rack.
- Refer to the illustrations for examples of the proper alignment of the slide-bracket assemblies.
- Position the slide-bracket assembly behind the
mounting rail so that the slides will extend out
from the front of the rack.
- If necessary, loosen the screws at the rear of the
slide bracket assembly and adjust the length of
the slide-bracket to fit the mounting rail. Tighten the screws.

- Position a nut bar behind the slide-bracket assembly.
- Insert screws (16M by 16 mm) through the
mounting rail, slide-bracket assembly, and nut
bar. Do not tighten the screws.

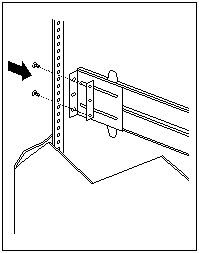
- Attach the slide bracket assembly to the rear of the rack:
- Position the slide-bracket assembly inside the mounting rail.
- Position a nut bar behind the slide-bracket assembly.
- Insert screws through the mounting rail, slide-bracket assembly, and nut bar.
Do not tighten the screws.

- Attach the other slide-bracket assembly to the front
and rear of the rack.
- Push the slide-bracket assemblies to the outermost
positions on the rack.
- Tighten all screws to secure both slide-bracket
assemblies.
If you are using a torque screwdriver,
use the following torque setting: 8-11 Nm (70.8-97.0 in/lbs).
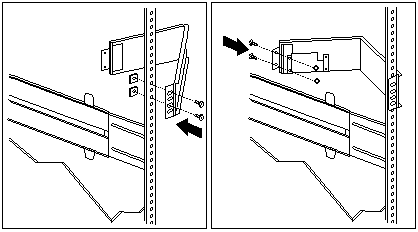
- Attach the cable-management arm to the rear of the rack:
- Position the cable-management arm bracket on the outside of the mounting rail.
- Insert screws (M6 by 16 mm) through the cable-management arm bracket, mounting rail,
and cage nuts. Tighten the screws.
- Position the server bracket on the cable-management arm.
- Insert screws through the cable-management arm and the server bracket. Tighten the screws.
Back to 
More INFORMATION / HELP is available at the IBM-HelpCenter
Please see the LEGAL - Trademark notice.
Feel free - send a  for any BUG on this page found - Thank you.

 To ensure rack stability, plan the installation of servers
in the rack starting from the bottom.


 for any BUG on this page found - Thank you.