 |

 IBM-AUSTRIA - PC-HW-Support 30 Aug 1999
 |
Hot-Swap Drive Installation (Netfinity 7000 - 8651)
Hot-Swap Drive Installation
The two banks of bays on the right front of the server
support hot-swap drives only.
 You do not have to power-off the server to install
hot-swap drives in these bays. However, you must
power-off the server when performing any steps that
involve installing or removing cables, except where
instructed to do so when you are replacing a hot-swap
fan. (See 'Hot-Swap Fan Replacement').

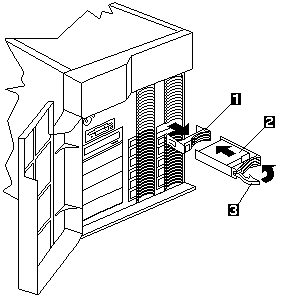
- Filler panel
- Hot swap hard disk drive
- Drive tray handle (open position)
To install a drive in a hot-swap bay, do the following:
- Unlock and open the server door.
 To maintain proper system cooling, do not
operate the server for more than two minutes without either a drive or a
filler panel installed in each bay.
- Remove the filler panel -1- from one of the empty
hot-swap bays by inserting your finger into the
depression at the left side of the filler panel and
pulling it away from the server.
- Install the hard disk drive -2- in the hot-swap bay:
- Ensure the tray handle -3- is open (that is,
perpendicular to the drive).
- Align the drive/tray assembly so that it engages
the guide rails in the bay.
- Gently push the drive assembly into the bay until
the drive connects to the backplane.
- Push the tray handle to the right until it locks.
- Check the hard disk drive status indicators to verify
that the hard disk drives are operating properly. See
'Status Indicators' for details.
- Close and lock the server door.
- If the server has a RAID adapter installed, refer to the
RAID adapter documentation for details about configuration requirements.
Back to 
More INFORMATION / HELP is available at the IBM-HelpCenter
Please see the LEGAL - Trademark notice.
Feel free - send a  for any BUG on this page found - Thank you.
 You do not have to power-off the server to install
hot-swap drives in these bays. However, you must
power-off the server when performing any steps that
involve installing or removing cables, except where
instructed to do so when you are replacing a hot-swap
fan. (See 'Hot-Swap Fan Replacement').

 To maintain proper system cooling, do not
operate the server for more than two minutes without either a drive or a
filler panel installed in each bay.
 for any BUG on this page found - Thank you.