 |

 IBM-AUSTRIA - PC-HW-Support 30 Aug 1999
 |
5.25-Inch Removable-Media Drive (Netfinity 7000 - 8651)
5.25-Inch Removable-Media Drive
NOTE: The server's EMI integrity and cooling are both
protected by having the left front bays covered or
occupied. When you install a drive, save the filler
panel from the bay, in case you later remove the drive
and do not replace it with another.

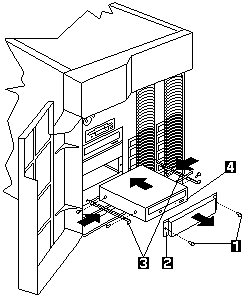
- Screws
- Filler panel with EMI shield
- Slide rails
- Drive
To install a removable-media drive in one of the left front bays:
- Power-off the server and peripheral devices and
remove the top cover (see 'Cover (Top)'
- Remove the media bay trim bezel, which covers the
screws -1- on the bay filler panels -2-
- Release the two tabs at the bottom edge of the
bezel and pull the bottom of the bezel slightly
away from the server.
- Pull the bezel down to release the two tabs at
the top edge of the bezel. Set the bezel aside.
- Remove the screws -1- and filler panel -2- from the
bay opening. Save the panel and screws for later use.
- Touch the static-protective bag containing the drive to
any unpainted metal surface on the server, then,
remove the drive from the bag and place it on a
static-protective surface.
- Set any jumpers or switches on the drive according to
the documentation that comes with the drive.
- Use screws of the appropriate size and length to
attach a slide rail -3- to each side of the drive -4-
NOTE: The slide rails and screws are included in the
drive accessory kit that comes with the server.
- Place the drive so that the slide rails engage in the
bay guide rails. Push the drive into the bay and
attach it with the two screws -1- from the filler panel.

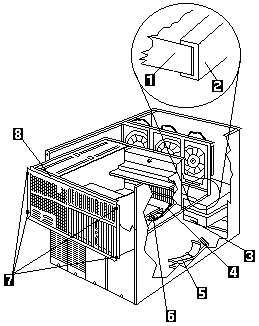
1. Air baffle
2. Shuttle-support rail
3. Drive
4. Opening in shuttle
5. 4-drop SCSI cable
6. SCSI ports A and B
7. Screws
8. Shuttle
- Loosen the four screws -7- on the shuttle at the back
of the server.
- Pull the shuttle -8- toward the back of the server.
- Observe the way the edges of the air baffle -1- fit
inside the shuttle-support rails -2-, then, slide the air
baffle toward the rear of the server and lift it out of the server.
- If you have not previously done so, install the 4-drop SCSI cable:
- Disconnect the SCSI cable from either SCSI port
A or B -6- on the system board. (SCSI port A is
connected to the hot-swap backplane for the
right bank, Bank A, of hot-swap drives, and SCSI
port B is connected to the hot-swap backplane
for the left bank, Bank B, of hot-swap drives.
NOTE: If you disconnect the SCSI cable from SCSI
port A, the server will not support drives in
Bank A. If you disconnect the SCSI cable
from SCSI port B, the server will not support drives in Bank B.
- Locate the 4-drop SCSI cable -5-. The 4-drop
SCSI cable is shipped (disconnected) in the
bottom of the server between the open bays and
the power supply area. It is folded and
restrained with a cable clamp.
- Open the cable clamp holding the 4-drop SCSI
cable and route the prefolded cable through the
opening -4- in the front of the shuttle.
- Connect the 4-drop SCSI cable to the vacant
SCSI port -6- on the system (planar) board.
- Connect one of the connectors on the 4-drop SCSI
cable to the back of the drive -3-
- Connect a power cable to the back of the drive.
Power cables for removable-media drives come
installed in the server. The connectors are keyed and
can be inserted only one way.
- If you are installing another 5.25-inch drive, do so at
this time. Otherwise, continue with the next step.
 If the air baffle is not installed correctly, the
server will overheat.
- Install the air baffle -1-. Make certain that the edges
of the air baffle fit inside the shuttle-support rails -2-
- Push the shuttle -8- toward the front of the server
and tighten the four screws -7- at the back of the shuttle.
- Install the bezel that you removed from the removable-media bay area:
- Insert the two tabs on the top of the bezel in the
matching holes on the server.
- Push the bottom of the bezel toward the server
until the two tabs at the bottom of the bezel snap into place.
Back to 
More INFORMATION / HELP is available at the IBM-HelpCenter
Please see the LEGAL - Trademark notice.
Feel free - send a  for any BUG on this page found - Thank you.


 If the air baffle is not installed correctly, the
server will overheat.
 for any BUG on this page found - Thank you.