| Using the External Media Bay | |
| Setting Up a Second Hard-Disk Drive |
Back to Contents Page
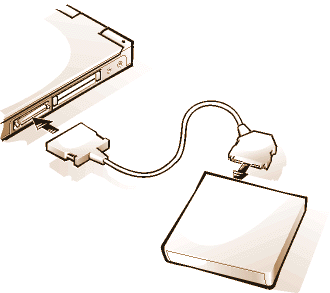
You can use the external media bay (see Figure 1) for the diskette drive that comes with your system. Alternatively, you can install an optional device (such as a CD-ROM, DVD-ROM, SuperDisk LS-120, or second hard-disk drive) in the bay.
| NOTE: If desired, you can use the media bay cable to connect a device directly to the external media bay connector, without using the external media bay. |
To install a device in the external media bay, perform the following steps:
NOTICE: When a device is not inside the
external media bay, it is fragile and must be handled carefully to avoid damage. Do not
press down on it or place a heavy object on top of it. Place the device in a travel
case to keep it free of dust and liquids. Store the device in a safe place.
Figure 1. External Media Bay
You should hear a click when the device is fully seated.
Position the larger of the cable connectors with its shiny metal lip down, and connect it
firmly to the back of the device through the slot in the back of the bay. Make sure that
the securing clips are fully engaged and the connector is fully seated. Make sure that the
other end of the cable is connected to the media bay connector on the right-hand side of
the computer (see Figure 1).

| NOTE: For the latest information on Softex Docking Services software, see http://www.dell.com/products/notebook/latitude/NT40.htm. |
The first time you install a second hard-disk drive in the external media bay, you must
format that drive. For instructions, see the documentation that came with the device.