Unlike many diagnostic programs, the Dell Diagnostics helps you check your computer's hardware without any additional equipment and without destroying any data. By using the diagnostics, you can have confidence in your computer's operation. And if you find a problem you cannot solve by yourself, the diagnostic tests can provide you with important information you will need when talking to Dell's service and support personnel.
NOTICE: Use the Dell Diagnostics to test only your Dell computer. Using this program with other computers may cause incorrect computer responses or result in error messages.
The Dell Diagnostics provides a series of menus and options from which you choose particular test groups or subtests. You can also control the sequence in which the tests are run. The diagnostic test groups or subtests also have these helpful features:
Whenever a major component or device in your computer does not function properly, you may have a component failure. As long as the microprocessor and the input and output components of your computer (the display, keyboard, and diskette drive) are working, you can use the Dell Diagnostics. If you are experienced with computers and know what component(s) you need to test, simply select the appropriate diagnostic test group(s) or subtest(s). If you are unsure about how to begin diagnosing a problem, read the rest of this section.
If Dell installed the Microsoft® Windows® 95 or Windows 98 operating system on your computer's hard-disk drive, see the online help in Dell's Program Diskette Maker utility, which is available in the Dell Accessories group or folder, for instructions on making a program diskette set from the diskette image.
Refer to your operating system's documentation for information on how to duplicate diskettes. Put the original diskette away for safekeeping. Turn on your printer if one is attached, and make sure it is online. Enter the System Setup program, confirm your computer's system configuration information, and enable all its components and devices, such as ports.
After you complete the preliminary instructions specified in "Before You Start Testing," perform the following steps to start the diagnostics:
| NOTE: Before you read the rest of this subsection, you may want to start the Dell Diagnostics so that you can see it on your display. |
When you start the diagnostics, the Dell logo screen appears, followed by a message telling you that the diagnostics is loading. Follow the screen prompts to insert the second and third diskettes.
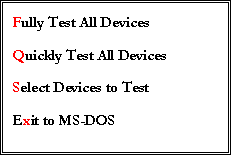
After the diagnostics loads, the Diagnostics Menu appears (see Figure 1). The menu allows you to run all or specific diagnostic tests or to exit to the MS-DOS® prompt.
For a quick check of your computer, select Quickly Test All Devices. This option runs only the subtests that do not require user interaction and that do not take a long time to run. Dell recommends that you choose this option first to increase the odds of tracing the source of the problem quickly. For a thorough check of your computer, select Fully Test All Devices. To check a particular area of your computer, select Select Devices to Test.
To select an option from this menu, highlight the option and press <Enter>, or press the key that corresponds to the highlighted letter in the option you choose.

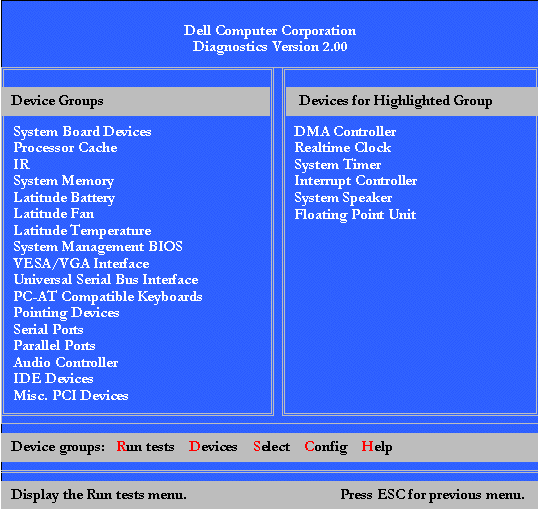
When you select Select Devices to Test from the Diagnostics Menu, the main screen of the diagnostics appears (see Figure 2). The main screen lists the diagnostic test device groups, lists the devices of the selected device group, and allows you to select categories from a menu. From this screen, you can enter two other types of screens.
Information on the main screen of the diagnostics is presented in the following five areas:
| NOTE: The options displayed on your screen should reflect the hardware configuration of your computer. |
Figure 2. Dell Diagnostics Main Screen

When you boot your computer from your diagnostics diskette, the diagnostics checks your system configuration information and displays it in the Device Groups area on the main screen.
The following sources supply this configuration information for the
diagnostics:
Do not be concerned if the Device Groups area does not list the names of all the components or devices you know are part of your computer. For example, you may not see a printer listed, although you know one is attached to your computer. Because your printer is a parallel communications device, the computer recognizes the printer by its LPT1 address and identifies it as a parallel port. You can test your printer connection in the Parallel Ports tests.
Six comprehensive, menu-driven, online Help categories provide
instructions on how to use the program and explain each menu item, test group, subtest,
and test and error result. To enter the Help menu, perform the following steps:
The Help menu categories are Menu, Keys, Device Group, Device, Test, and Versions. The online Help also provides detailed descriptions of the devices that you are testing. The Help categories are explained in the following subsections.
Menu describes the main menu screen area, the Device Groups, and the different diagnostic menus and commands and instructions on how to use them.
Keys explains the functions of the all of the keystrokes that can be used in Dell Diagnostics.
Device Group describes the test group that is presently highlighted in the Device Groups list on the main menu screen. It also provides reasoning for using some tests.
Device is the educational section of online Help. It describes the function and purpose of the highlighted device in the Device Groups.
For example, the following information appears when you select Device for Diskette in the Device Groups list:
Diskette drive A:
The diskette disk drive device reads and writes data to and from diskettes. Diskettes are flexible recording media, sometimes contained in hard shells. Diskette recording capacities are small and access times are slow relative to hard disk drives, but they provide a convenient means of storing and transferring data.
Test provides a thorough explanation of the subtest for each selected device group. For example, the following description is provided for the Diskette Drive Seek Test:
Diskette drive A: - Diskette Drive Seek Test
This test verifies the drive's ability to position its read/write heads. The test operates in two passes: first, seeking from the beginning to ending cylinders inclusively, and second, seeking alternately from the beginning to ending cylinders with convergence towards the middle.
Versions lists the version numbers of the subtests that are used by the Dell Diagnostics.